Local & Lejos Giveaway Win

Hi everyone!

I wanted to do something a little bit different today in order to show my appreciation to SF Girl by Bay and Local & Lejos. Quite a while ago now, I entered a giveaway hosted on SFGirlByBay’s blog. It was to win $500 worth of home decor items on Local & Lejos website.

To my great surprise I won! I had never entered a giveaway before let alone an online one. I didn’t expect anything at all. Timing couldn’t have been better though. We have finished a lot of work on the insides of the house, but hadn’t really decorated yet.

I was catching up on some blogs I subscribe to and saw the giveaway. I looked up Local & Lejos and thought, yeah, it would be awesome if I won some stuff. And I loved that everything is Fair Trade.

So here’s my haul!

Local and Lejos Home Decor

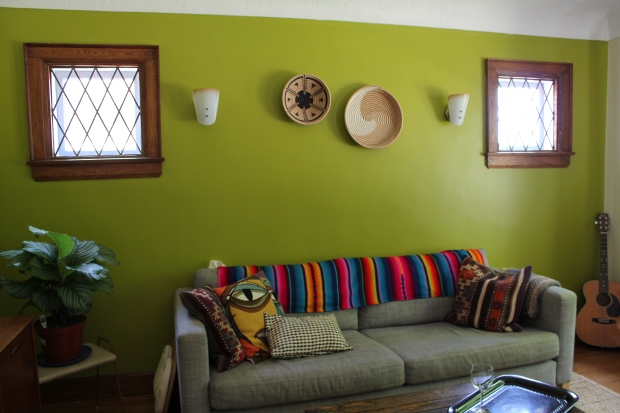
I got these great bowls! Actually one is a tray. For now they are acting as a placeholder for when we get a large picture or painting to hang over the couch. At least that was the initial idea. We haven’t found anything yet and it’s been ages. I like them though and I think they really fit with the eclectic vibe we have going in the living room. Who knows, maybe we’ll add more bowls.

Bowl and Tray Local and Lejos

Next up this great serape. I’ve been dying to have a serape like this for quite some time. I love how bright it is. It instantly makes me think of summer. This past winter I had a thick afghan on the back of the couch. But this winter I think I might leave the serape and just pull out the afghan I used last year when I am absolutely freezing.

Local and Lejos Serape

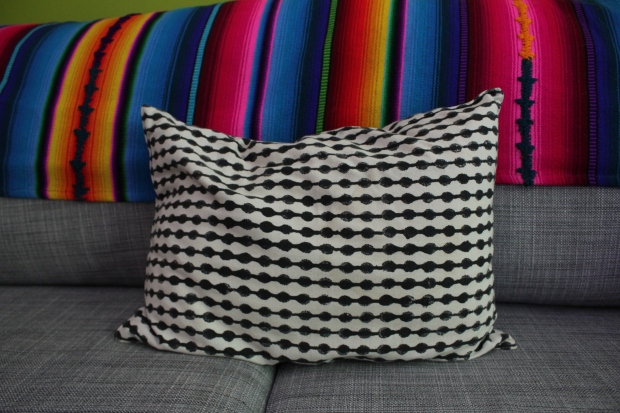
This little pillow! These pillows were such a surprise for me. I liked the pattern and how the black and white kind of broke up the colours I had going on in the living room. And it truly is wonderful for propping your head up when your lounging and watching television. But mostly it is the best pillow for napping. The fabric is amazing. The other pillow I thought would be nice in the spare bedroom. To be honest, I wish I had chosen more of these. They are so soft, the fabric is great quality and whatever they used to stuff the pillows is literally the perfect balance between soft and firm great for cradling your head and neck after a long day.

Local and Lejos Pillows

Local and Lejos Pillows

This basket though! I love the colour and it goes great in almost any of the rooms in the house. I’ve seen it on Instagram used as a plant holder. And that’s what we plan on using it for. For now it sits empty. I’m sure we could use it to put pillows or throws in, but we are always looking for the perfect plant to go in there. We want a tall one for a corner in the living room and the basket will be big enough for sure.

Local and Lejos Storage Basket

I chose these fun tea towels. They make a good accent in my kitchen and it goes with the accent colour of reddy orange I chose.

Local and Lejos Tea Towels

Local and Lejos Tea Towels

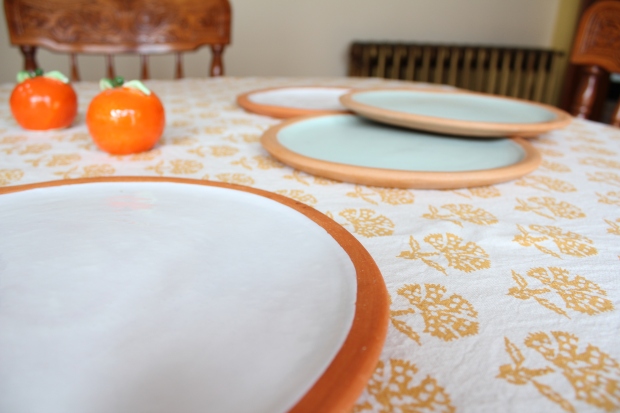
Finally, I got these plates! I think they are so cool! At one time they had bowls and mugs too, but they were so popular I missed out on those. These plates are hand made and the clay feels so nice. I can’t wait to use these either as trays for dessert or cheese and cracker stuff or even just for dinner. They’re quite heavy and because of that I don’t want to use them everyday. I wouldn’t want to break one while I was doing dishes.

Local and Lejos Clay Plates

Local and Lejos Clay Plates

So thanks again to SFGirlByBay for hosting the giveaway and to Local and Lejos for providing such great home goodies for winning. And to both for just being super awesome, so make sure you check them out. SFGirlByBay often hosts giveaways usually for amazing home goods, and her blog is design for the home–it’s super stylish. Local and Lejos has some new stuff in the shop and some things I’ve mentioned in this post so be sure to pay them a visit.

That’s all for now, I’m going to try and make these posts more regular. I kinda got side tracked this summer because I was busy planning my own wedding and getting married yadda yadda yadda. Yes, it was exciting times.


My Home Office in a Small Space

Time for Office Space! No not the film. And not the television show either. Sorry to get your hopes up. That’s fun, but I hope my home office will be more fun and  updated than the office decor in that film and way cooler than in that television show (British and American).

How I set up my home office. Sarah Skry. Niagara. Toronto. Hamilton. Niagara Falls. Niagara Region.

This space was my dad’s old room. How weird is that. This was even on the closet door. Don’t worry, I took it off. I’m not that sentimental. No, I didn’t throw it away, I gave it to my dad. I’m not that heartless. Geez what kind of person do you think I am? Just kidding.

If you want to see what the entire office looked like before, check out my previous post here.

How I set up my home office. Sarah Skry. Niagara. Toronto. Hamilton. Niagara Falls. Niagara Region.

How I set up my home office. Sarah Skry. Niagara. Toronto. Hamilton. Niagara Falls. Niagara Region.

This is what the closet door looks like now. It’s so much happier. I like wood, but there was so much of it in this small space with the floor and it is a pretty orangey stain. The white really freshens it up and we put a fun knob on from Anthropologie for a folky look.

How I set up my home office. Sarah Skry. Niagara. Toronto. Hamilton. Niagara Falls. Niagara Region.

And the space isn’t just a home office, we want to make it into a sort of an office/den/workout/hangin’ out area. Right now Derek and I watch “This Old House” on my 13″ laptop. Certainly not ideal. We don’t really want just a television either. It seems like it’d just be an outdated appliance taking up room, so instead we are saving up for a MAC desktop computer. Then we can use it for many things. And we’re going big, because why not, especially if we’re going to watch TV and movies on it.

That’s not it’s sole purpose either. My laptop is great, it’s definitely been a workhorse for me. And I’m sorry to say it has taken quite the beating over the years. Sorry laptop and sorry I never gave you a proper name. I think a new desktop will be better equipped to handle more Photoshop, more Illustrator, more photos etc. And I vow to keep it organized and clean! Vows are serious business.

How I set up my home office. Sarah Skry. Niagara. Toronto. Hamilton. Niagara Falls. Niagara Region.

The couch is from Ikea obviously. The Stocksund loveseat. I had been fixated on the red one for quite some time and had envisioned it in the office since we moved in. I also knew we would keep the walls white (in the office at least) and so I wanted to bring in some vibrancy in the furniture.

How I set up my home office. Sarah Skry. Niagara. Toronto. Hamilton. Niagara Falls. Niagara Region.

This chair I am using at the moment is amazing! Derek was so reluctant to put this in the office at first. When we moved in, the chair was in the basement and had been buried in rubble. It was disgusting and it also had this weirdo set of stairs attached to the bottom. I imagine it was initially a high chair for children and the steps were there so they could climb up. And it was dirty.

I saw it and knew right away I wanted it in a room somewhere and the height of this supposed desk is taller than most. Somehow this chair is at the perfect height for the desk. AND it matches this set of three stools I took from my parents house. I love the metal and the shape of the back of it. It’s more comfortable than it looks. I can’t get my legs completely under the desk either, but I attribute that problem to this custom dresser/desk thing and not a problem of the chair.

One day soon I hope to dismantle this built in desk. Everyone seems to be against it, but I don’t care, I’m standing up for what I believe in. It was originally built for my dad as a dresser. We don’t need that many drawers for anything. I mean we have filled most of them but with old DVDs we could probably stand to get rid of. Because the drawers don’t get much use, things think they can live in there. Also known as my worst nightmare. Plus there is quite a large closet. Plus there are things you can buy called filing cabinets. Plus if this was ever turned into a bedroom again there are these things called dressers. I’d prefer something more multi-use.

Of course some final touches are still needed. I like to hang a plant somewhere, get a shag rug and maybe a side table and shelves. It will all fit, just need to find the right size for everything.

We have basically kept all the original character in this house. Is it so wrong of me to ask for one and half feet of extra room in this tiny office? And get rid of the honking desk. Plus it’s got this weird laminate on top. I mean we painted it so it’s better, but you know…ew. The vent in the desk for the radiator is definitely staying. The cats sleep on it. These are my priorities haha.

How I set up my home office. Sarah Skry. Niagara. Toronto. Hamilton. Niagara Falls. Niagara Region.

There is one catch with removing the desk. The floor doesn’t continue underneath, and needless to say this is some pretty one of a kind flooring we got. Either we scavenge thrift stores looking for suitcases with wooden bottoms or we come up with another solution. If you have no idea what I’m talking about I’ll refer to here.

It is my feeling that we can make it super cool without trying to match the impossible. Only Tommy from This Old House could do that (I may be a little obsessed). What I thought was we could make a transition with tile like this. Again so many nay sayers. The nay sayers say that can only be used as a room division. Well I say they’re wrong! Help me out readers, what do you think?


The Upstairs Update

Progress Update!

Where does one go after finishing an amazing bathroom?! Well actually when renovating a house there is lots to do. Sorry, that was a bit anticlimactic. We decided to to the upstairs next. Mainly because, other than the kitchen, it was the only place we hadn’t really changed in any way. The only way it has been improved was that it was clean and we put furniture in the space.

Another suggestion from most home improvement blogs is “What home improvement can you do in the winter?” Interior painting of course! Except maybe when you live in an old house and want to paint the interior window frames. In order to do that we needed to remove the interior windows, which meant letting lots of cold air in. The storms are good, but they’re not perfect. Because we’re getting married in the summer, winter is the best time we have to paint upstairs.

You can check out my earlier post to see what the walls looked like. Spoiler Alert: they’re disgusting! I tried cleaning them when we first moved in but “the dirt” didn’t come off, but instead just seemed to move around on the wall. It is unanimously thought that this is the result of nicotine. We knew we would have to prime before painting and even before priming fix all those cracks and holes in the wall and sand.

Home improvement you can do in the winter-Office natural light-Upstairs updated-sarahskry-Hamilton, GTA, Toronto, and Niagara

People always say that paint is the easiest way to change the look and feel of a room. While I believe this to be true in most cases, in this case it is the way to change it but it’s certainly not the easiest. The amount of prep work involved before painting was ridiculous.

The primer we are using is from Allback Paint. We chose to go with this zero VOC free and alcohol free primer because of the type of primer we used in the mudroom. You can see the post here where we used Zinsser 123 Primer, it is widely used especially for nicotine stains and almost guaranteed to work. It certainly did the job we needed it to do covering all of this. Doing the job turned out to be fairly miserable. The paint dried quicker than we could paint making it difficult to have a smooth finish. Also the amount of fumes was overwhelming. We had the door leading outside in that room open as well as the windows and the odor was still suffocating. I began to feel light-headed and wheezy so Derek was nice enough to endure till the end.

Home improvement you can do in the winter-Office natural light-Upstairs updated-sarahskry-Hamilton, GTA, Toronto, and Niagara

Naturally we wanted to try and go for a more natural route since we are painting a much larger and less contained area. The only thing with the Allback Primer is that it looks terrifying going on. It is brown. Reeeally brown. It is watery in texture and dries quickly, and still remains smooth. Trying to avoid drips was difficult but definitely manageable if you keep a damp rag on hand.

Home improvement you can do in the winter-Office natural light-Upstairs updated-sarahskry-Hamilton, GTA, Toronto, and Niagara

We used a regular latex paint/primer combo on top just to be sure everything covered properly. It did and it looks great. We chose white in the end partly because when deciding on a colour, the colour kept changing and no colour ever felt right. The upstairs gets a fair amount of natural light and we wanted to emphasize that and make the space feel a little more airy since it is just a half story.

We didn’t really like how the trim looked either so we painted it with Sage Green Linseed oil paint from Allback Paint. It has more of a matte finish and we thought the white matte paint would also make it look more like plaster and to go with the plaster vibe in the office

Home improvement you can do in the winter-Office natural light-Upstairs updated-sarahskry-Hamilton, GTA, Toronto, and Niagara

We couldn’t be happier with how it turned out. It finally looks clean up here and takes advantage of that early day light. Instead of feeling like the upstairs is cut off and disconnected from the rest of the house and avoid spending time in, it is now a space we can feel comfortable and happy hanging out in.

Home improvement you can do in the winter-Office natural light-Upstairs updated-sarahskry-Hamilton, GTA, Toronto, and Niagara

Home improvement you can do in the winter-Office natural light-Upstairs updated-sarahskry-Hamilton, GTA, Toronto, and Niagara

Now all we need is some plants!

.


Finished Bathroom!

The time has come for my finished bathroom reveal! Finally. It is 2016 now, which makes it more important for me to get this post up now otherwise it will feel like it will never happen.

It has taken nearly a whole year altogether to get this bathroom finished completely. From demo to finish. I was kind of hanging on for some last finishing touches, but I don’t want to rush finding certain items soooooo…Let’s get on with it! Here’s the Before + After.

Before and After Bathroom Renovation with hexagon tiles. 1945. sarah skry. Hamilton, GTA, Toronto, and Niagara

The bathroom was seriously a team effort. Our family was so helpful it was great.

We did try to save what we could, which turns out isn’t much. If you can believe it the bathroom had been updated at some point since 1945 with some wicker details in the bathroom vanity and mirror. It was legitimately hanging on by a nail and some sketchy electrical installed through it. It needed to go. The new medicine cabinet is from Home Depot and I liked it because I thought it mirrored the window that is latched in the bathroom.

Before and After Bathroom Renovation with hexagon tiles. 1945. sarah skry. Hamilton, GTA, Toronto, and Niagara

Gord helped us install the lights which I love. Originally I wanted them facing downward, it was his suggestion to have them facing up. It made the most sense with the height they are at and makes the bathroom feel larger in my opinion. He helped with all of the electrical, which helped us save massively.

Derek and I made the shelves above the toilet with some old wood we found in the garage. I bought the brackets from Home Hardware and the light fixtures are from Ikea. We had hooks from my apartment in Toronto that we got from Home Depot and I wanted to use them to hang towels on. I had it in my mind that I’d like the same hooks in the Mudroom to hang coats on and that this way the hooks, shelves and brackets would match our coffee table in the living room that was originally in my first apartment too!

Before and After Bathroom Renovation with hexagon tiles. 1945. sarah skry. Hamilton, GTA, Toronto, and Niagara

My hope was to make our home more cohesive, I hope.

Before and After Bathroom Renovation with hexagon tiles. 1945. sarah skry. Hamilton, GTA, Toronto, and Niagara

He also put the drop curved ceiling in, it is such a nice detail in the bathroom and the curved shower curtain rod that helps emphasize it.  It mimics the curve on the tub as well. And honestly while standing inside the bathtub it, this detail makes it feel like a much larger space than it is. If I keep saying that throughout this post it’s because it’s true! And I’ve never felt so lucky than when I’m standing in my tub showering. I love it all.

Before and After Bathroom Renovation with hexagon tiles. 1945. sarah skry. Hamilton, GTA, Toronto, and Niagara

That detail along with keeping some of those older things original to the house is what helps make it home to me. Blending the new and the old. Like the original light fixture. Or the scale, which still works by the way! It just needed some cleaning.  It’s more there for looks and fun than use though.

Before and After Bathroom Renovation with hexagon tiles. 1945. sarah skry. Hamilton, GTA, Toronto, and Niagara

We kept all the towel rods that are original to the house. We only used one full one for hand towels. Derek had a perfect idea for re-purposing the other rod that was under the window. We were looking for the perfect toilet paper holder that would match the hardware we had. No luck. Derek cut the towel rod and put it back together so that it was perfect for holding toilet paper. It’s the best.

Oh the tile! I love all the tile! Derek toiled with the tile in the bathtub surround and we both did the floor tile. If you want some tips check out our post on installing hex tile here.

Before and After Bathroom Renovation with hexagon tiles. 1945. sarah skry. Hamilton, GTA, Toronto, and Niagara

Before and After Bathroom Renovation with hexagon tiles. 1945. sarah skry. Hamilton, GTA, Toronto, and Niagara

I really wanted a niche. And I wanted it tiled. I can’t even explain to you why, it seemed like something to me that was only in luxurious bathrooms for some reason. Maybe it was all of the home reno shows I watched that always installed one. Or all the Pinterest photos of bathrooms that had them. I really wanted one and I got one. Thanks Gord! I know you were reluctant about us tiling it because of water penetration concerns, but it looks great and it stays very dry. We did angle the tile slightly, but where it is located in the shower, the water doesn’t even hit it. That’s a sea sponge by the way. I use it instead of a loofa.

Some things we wanted to add as finishing touches? Well It would be nice if we could find a small stool for beside the bathtub for clothes or whatever. Right now I’ve been setting them on top of the toilet—not so elegant but it works right? We found a chair but it was too big. We both would like a larger, fuller vine plant to place on top of the mirror but for now I am just propagating a small pathos plant.

That’s it!

Before and After Bathroom Renovation with hexagon tiles. 1945. sarah skry. Hamilton, GTA, Toronto, and Niagara

Before and After Bathroom Renovation with hexagon tiles. 1945. sarah skry. Hamilton, GTA, Toronto, and Niagara

So Yay! to another year gone and a new one ahead. Here’s to more “after” posts this year! I hope you all had a good new year and I hope you stick with me and my blog neighbour.


Brigadeiro! Holiday Party Edition

How to make brigadeiro for the holidays. sarah skry. Hamilton, GTA, Toronto, and Niagara

Hi there, I know it’s been a long time since my last post but I am coming at you strong with a tasty treat. A tasty Brazilian treat. It’s called Brigadeiro. Say it with me, BRI-GA-DEI-RO. It’s fun to say. I haven’t spoke too much about my background on this blog yet, and this is something I am quite proud to know how to make as a Brazilian lady, I was born in Brazil, but didn’t grow up with its culture.

Brigadeiro is a treat that makes an appearance at every party in Brazil. It’s also referred to as “the Brazilian Truffle”. I have to say that if you like sweets, this treat will not disappoint.

How to make brigadeiro for the holidays. sarah skry. Hamilton, GTA, Toronto, and Niagara

It sounds fancy and complicated, but making them is actually fairly simple. You’ll need:

+ 1 can of condensed milk

+ 1 tbsp of butter

+ 3 tbsp of unsweetened cocoa powder

And add any toppings that make your mouth water! This is the holiday edition though so I crushed up some candy cane. But you can use anything. Chocolate sprinkles, rainbow sprinkles, coconut shavings, sugar or just use the cocoa powder itself.

How to make brigadeiro for the holidays. sarah skry. Hamilton, GTA, Toronto, and Niagara

How to make brigadeiro for the holidays. sarah skry. Hamilton, GTA, Toronto, and Niagara

It’s up to you really if you want to add the cocoa powder. I like to make one can of condensed milk with cocoa powder and another one without. That way I get some that resemble a truffle and some that are just tasty candy.

How to make brigadeiro for the holidays. sarah skry. Hamilton, GTA, Toronto, and Niagara

In a medium saucepan on medium heat, melt the butter and pour in the can of condensed milk. Stir occasionally making sure the bottom doesn’t burn for approximately 15 minutes. It should lightly boil during this entire time. You’ll notice the milk will become much thicker.

How to make brigadeiro for the holidays. sarah skry. Hamilton, GTA, Toronto, and Niagara

When it’s finished. Let it sit and cool for about 15 minutes. You’ll notice it become thicker and like play-dough. You can use a spoon or your hands to pick up a small piece and roll it into a ball.

Then just toss in your choice of topping. Go nuts! Seriously use nuts or whatever else you want, you can even mix in nutmeg or ginger for a more spicy seasonal flavour. Think of that condensed milk as a blank canvas.

How to make brigadeiro for the holidays. sarah skry. Hamilton, GTA, Toronto, and Niagara

I bought these festive little metallic cups to put them in afterwards. This is the holiday party edition after all. Again these are a real crowd pleaser with adults and children enjoy them too, especially the rainbow sprinkle variety.

While they are great to have at parties with wine or champs as they easily pop into your mouth, brigadeiro is great as an indulgent treat with coffee or tea too. Eat up and have fun!

How to make brigadeiro for the holidays. sarah skry. Hamilton, GTA, Toronto, and Niagara


Why I Learned How to Knit

IMG_5435

Hi Neighbours,

I wanted to tell you all about why I started to knit. It’s not for the reason you’re thinking. I know in the past couple of years knitting has been trending, it has become indicative of the Do It Yourself and Etsy lifestyle. You can make things yourself and you can sell your one-of-a-kind handcrafted goods too. It’s really “hipster” as well, but I don’t like stereotyping.

Anyways, a couple of years ago I decided I wanted to learn how to knit. My mom knits. We have had hand knitted and crocheted blankets my entire life. And I definitely took them for granted. We never had to buy a throw. There were always mounds of blankets hanging out in various areas of our living room. I was probably the only one though, who constantly had a blanket on throughout all twelve months of the year. I run cold. My mom knitted very often and my aunt Trudy (my mom’s sister) knits somewhat compulsively haha.

One day I thought, if I don’t learn how to knit, these blankets I have at home, some worn out more than others, will be all I have left for the rest of my life. Assuming I inherit all of the blankets. I’m not sure of exactly when this thought occurred to me, but I am sure of the feelings it brought up when it did. I was sad. I thought “if I were to have a family of my own they would not know the same warmth and comfort I felt when I sat in my home wrapped in a hand knit blanket”. .

I know at one time, much earlier in my life, my mom tried to teach me how to knit. She has little patience and a younger me had a very short attention span. It was hopeless haha! So I asked if she would teach me and it went very well the second time around. I have way better concentration these days. First I learned how to read a pattern, then how to cast on and off etc. She taught me continental knitting, which is the way they knit in Germany. My mom is from Germany, speaks German and knits German. I didn’t realize that different cultures and places had different ways of knitting. It is faster than knitting the English way. You can read about the different ways of knitting here and the history of knitting here. It is pretty interesting I must say. It is definitely a cultural practice and there are historical reasons as to why some places no longer use continental knitting.

I am not part German myself by blood, due to my adoption, but I consider it as much a part of me, if not more so, than my Brazilian background. I have been very happy to be able to carry on this tradition of knitting. In fact I have already knit one blanket. I’m slow finishing projects, but I do finish them. Here’s my first project.

why i learned to knit. Ikea strandmon wing back chair. sarah skry. Hamilton, GTA, Toronto, and Niagara

I made the blanket wide enough to fold in two and long enough to cover my feet. This basket weave was a fairly simple pattern.

why i learned to knit. sarah skry. Hamilton, GTA, Toronto, and Niagara

why i learned to knit. sarah skry. Hamilton, GTA, Toronto, and Niagara

I also did a scarf that didn’t take very long at all because it was just purely knitting and purling. It’s an infinity scarf and I quite like it. I got this wool from Michael’s. The other wool  I used for the blankets is from this place in Listowel, Ontario. My aunt Trudy and my mom like to go to this place because every summer they have a sale. Like I said my aunt Trudy knits a lot. She’ll go to this sale and buy several garbage bags full of wool and use it all before the end of the year. It looks like she could have robbed a wool factory. My mom had to give her some of her own wool this year to tide her over until the sale in Listowel was on. She knits lots of baby blankets and things and donates them which I think is a very nice thing to do. She enjoys knitting and it occupies her time, so it’s more the knitting for her that she enjoys than the actual product. Not so different from that saying about life, you know the one, “it’s the journey and not the outcome” something to that effect.

This is Charlie, my other cat, who is helping me model my knitting.

why i learned to knit. sarah skry. Hamilton, GTA, Toronto, and Niagara

why i learned to knit. sarah skry. Hamilton, GTA, Toronto, and Niagara

I started going with them to this sale and have enjoyed it very much even though I haven’t always come away with wool. This year sadly I will be missing out because I have to work. C’est la vie. I think that is partly why I’m writing this post. Also because I haven’t been knitting and it has helped me in the past with nerves and anxiety so I’d very much like to pick it up and finish my second blanket again. It’s been so long since I was working on it last.

I’m now working on a slightly more complicated pattern. I think it is good as a second project though as it covers several different kinds of stitches and it teaches me better to see the difference between stitches so I can more easily identify where I left off. As a confession, I did start this blanket a little over a year ago and this is the second time I have started this blanket. I had left the first blanket for so long, and I had made a mistake. I was away at school when I started it and couldn’t figure out how to fix it until I went home where I could ask my mom. When I finally remembered to bring it to her I couldn’t remember what went wrong or where I was. Ultimately I had to start all over.

why i learned to knit. sarah skry. Hamilton, GTA, Toronto, and Niagara

This is where I keep the knitting I am currently working on with the extra balls of wool inside. I got the basket from Ten Thousand Villages. I really like the basket and it’s super handy and colourful. The only downside is that I had it in a very sunny room at one point and it bleached it so it is much more faded now.

why i learned to knit. sarah skry. Hamilton, GTA, Toronto, and Niagara

My new goal is to first finish this blanket, and second to learn how to fix my own knitting mistakes. I’ll let you know how I get on with that. And maybe crochet. We’ll see!

Lime Green Extreme?

Lime green too extreme? No way! Not in my humble opinion anyway. I love it! I really didn’t at first though. We bought some cheaper paint from Home Hardware. We’ve bought other coloured paint there, but mostly off whites and pale yellows. For the lighter colours they used a white base and for this green colour they used a clear base. I have no idea what this means but the clear base seemed to make the paint thinner and didn’t cover nearly as well. And after 3 coats there are still spots that drive me crazy. Perhaps one day we will repaint it with better paint. Now we know better. That’s how we learn right!

The paint was Beauti-Tone and the name of the colour was…are you ready for this? Drum roll pease…Viva Las Vegas! It’s funny that they name the paints. I think it is nicer they have names, but Derek for instance can get hung up on the name if it is a particularly cheesy one. I admit it is hard to dissociate the colour from its name sometimes.

Choosing quality paint. mid century. sarah skry. Hamilton, GTA, Toronto, and Niagara

Choosing quality paint. mid century. sarah skry. Hamilton, GTA, Toronto, and Niagara

We painted only two walls as a sort of compromise. Initially I had wanted to paint all three walls green and paint the wall that continues into the hallway an off white. Derek thought that might be a little much and as we drew closer to painting day I was questioning my judgment even though I had the swatches on the wall for over 5 months. Right before buying the paint I asked Derek if he was sure—he was slow to answer so I shouted, “Well it’s too late. “We both laughed. Anyway, because we were both hesitant and the wall that the window wall is hardly seen because of the curtains we decided to paint that off white as well and just have two walls green.

Around the trim and along the ceiling was the most difficult to get good coverage, with a brush the paint just went on so thin and it wasn’t much better with the roller. And because we had to put so many coats on, when we peeled the tape off some of the paint came with it.

Choosing quality paint. mid century. sarah skry. Hamilton, GTA, Toronto, and Niagara

Choosing quality paint. mid century. sarah skry. Hamilton, GTA, Toronto, and Niagara

Everything else in the living room is the same as before except for two new additional pieces of furniture and a plant. We got a couple of chairs from my Aunt Trudy and Uncle Eddie. They had four of these mid century looking chairs and were nice enough to give us two. Perhaps at a later date and in a later post we can reupholster the chairs and clean them up. They’re in pretty good shape now though and very comfy.

Choosing quality paint. mid century. sarah skry. Hamilton, GTA, Toronto, and Niagara

The second new piece of furniture is this mid century looking credenza or media console. We found it on Kijiji. It did take some time though I had been checking Kijiji in my area for a console like this but they were all priced pretty outrageously. I checked about every 2 days to see what was new and finally found this one. It wasn’t necessarily what we ideally wanted, but it was close enough and has immediately proven itself useful. Everything that was hanging out on our coffee table or on the floor we can now put in here, hidden away.

Choosing quality paint. mid century. sarah skry. Hamilton, GTA, Toronto, and Niagara

I was so excited to get a new large tree/plant for the living room and after all the trends and pinteresting and looking on apartment therapy I obviously wanted a Fiddle Leaf Fig Tree. I got a simple pot from Home Depot and the tree was from a local greenhouse. My mom was nice enough to call around for one. I told her what I wanted and she had never heard of it. Since it wasn’t a massive priority of mine she took it upon herself to check for me. How nice!

Choosing quality paint. mid century. sarah skry. Hamilton, GTA, Toronto, and Niagara

I love it but am a bit sad that it isn’t doing to well. The leaves are browning and some have been falling off from the bottom. After looking online it seems like a pretty common problem with many different solutions. Maybe more light? Maybe more water? Maybe less water? Repot into a larger pot? I’m not sure. I’ll keep an update if I figure out what is going on and keep track if there’s any improvements. Fingers crossed.

IMG_5426

IMG_5425

Again, if anyone has any advice for plant care PLEASE  let me know. I want to improve what little green thumb I have. Or if anyone has a Fiddle Leaf Fig themselves. Or if anyone has succulent tips. Anything really for indoor plants! Hope to hear from some of you.

That’s all for now. There is a gallery wall in the works and some styling neither of which I have ever done before! Exciting times. Thanks for reading. Hope to catch you next time.

Return of the Mud Room

Hello Neighbour!

I’ve been excitedly busy with painting the house these past couple of weeks. I’m excited to show you the progress and an updated post about the living room is in the works. In the meantime, (after reading this post of course) why don’t you hop over and take a look at the living room prior to its update here, here and here. That last link includes original photos of the mud room as well.

Returning to the Mud Room—last time we checked in we needed to paint it to cover up all the nicotine stains and the oil paint . It would appear that my grandfather even painted over the oil paint with latex and there was quite a bit of crackling on the ceiling as a result. We sanded the window and door frames to smooth out all the layers of paint, but we didn’t go so far as to sand the ceiling because it seemed too large of a surface and too difficult to do well since we are people who are new to DIY.

Prepping nicotine stained walls and cracked plaster for painting.Easy tip for painting behind radiators. sarah skry. Hamilton, GTA, Toronto, and Niagara

We haven’t painted the doors yet because I think it will be easiest to take them off their hinges and bring them into the basement to sand. We have been holding off on account of our one cat Chewy. He likes to escape out the back screen door if the wood door is left open. The screen door doesn’t latch properly and he seems to have no problem pushing his way through all by himself. By the way, we have been scouring the advertisements to see what is on sale in the home improvement flyers. I finally spotted a DeWalt orbital palm sander at Home Hardware. We first asked around and managed to borrow one from Derek’s parents until we found a decently priced one on sale.

Prepping nicotine stained walls and cracked plaster for painting.Easy tip for painting behind radiators. sarah skry. Hamilton, GTA, Toronto, and Niagara

The window ledges were difficult to get completely smooth, there was a lot of paint in those areas and most of it began to chip. We did our best though.

Prepping nicotine stained walls and cracked plaster for painting.Easy tip for painting behind radiators. sarah skry. Hamilton, GTA, Toronto, and Niagara

Prepping nicotine stained walls and cracked plaster for painting. Easy tip for painting behind radiators. sarah skry. Hamilton, GTA, Toronto, and Niagara

The windows themselves sanded down fairly smooth, you can kind of see the crackling happening here with the old oil pain and the latex paint that was put on top.

So we needed to buy special paint to properly cover everything that couldn’t be removed via sanding or using harsh chemicals. The paint we used is called Zinsser. It is formulated to cover all kinds of things including oil paint and nicotine stains.

Prepping nicotine stained walls and cracked plaster for painting.Easy tip for painting behind radiators. sarah skry. Hamilton, GTA, Toronto, and Niagara

I will say, that this particular Zinsser paint is not easy to work with. It’s like painting with molasses. It goes on thick and dries quickly. The can says to let it dry 30 minutes before applying a second coat and I’d say it dries that fast if not faster. And it’s SMELLY. Very fumy indeed. If possible have a fan going and open the doors and windows.

Since my grandfather had painted all of the hardware as well I wanted to return it to its original state. After watching Rehab Addict (obviously) Nicole Curtis had a great tip to remove paint from hardware, especially really old caked on paint. I took her tip. I put the hardware into a crock pot that I got from a thrift store for super cheap ($7) and I will never use this to cook because the paint is toxic. I filled it with water so it fully covered the hardware and put in a good amount of laundry detergent. I wasn’t exact and I probably put more in than I needed, but just to be sure I put in about the same amount I’d use for a load of laundry.

How to strip paint from hardware. sarah skry. Hamilton, GTA, Toronto, and Niagara

How to strip paint from hardware. sarah skry. Hamilton, GTA, Toronto, and Niagara

I then turned the crock pot on and voila! I took the hardware out with some tongs, laid it on a towel and used the towel to scrub off the paint. It came off quite easily. Any stubborn bits came off with an ordinary kitchen scrub sponge. I put the hardware back on only after painting the windows.

How to strip paint from hardware. sarah skry. Hamilton, GTA, Toronto, and Niagara

How to strip paint from hardware. sarah skry. Hamilton, GTA, Toronto, and Niagara

The floors? Alas, the floors will remain the same until we decide whether or not we want to spend money laying wood over the linoleum. I think because it’s a mud room it is fine for now, but it would be a shame to have the room looking nice, and the floors not so much. I can see it now. As I enter what a lovely and cheery way to leave the house for the day. Let me put my shoes on…”Oh ew yuck what a dirty floor, I should only enter with shoes already on!” Anyway, I’ll keep you updated on that. My dad, who is more than a pack rat, acquired some left over wood flooring from someone or other and said we can use it if we like. We’ll have to see if there is enough and if there is we will probably use that. I don’t ask questions about why or how he comes into possession of these things. HA! I’m just thankful that comes in handy sometimes.

This is what the room looks like completely covered in Zinsser. It seems to have covered well enough and it is holding up so far. Not that we’re having crazy dance parties in there or anything. And here is the swatch of colour we were thinking of painting it, leaving the trim and doors white.How to strip paint from hardware. sarah skry. Hamilton, GTA, Toronto, and Niagara How to strip paint from hardware. sarah skry. Hamilton, GTA, Toronto, and Niagara

We plan to leave the outside of the pantry white. There is some debate going on about whether the inside walls of the pantry should be the same colour as the walls in the mud room or left white. And “do we paint the shelves?” was the next question. Here’s what it looks like now with all the cracks filled in and painted.

Prepping nicotine stained walls and cracked plaster for painting. Easy tip for painting behind radiators. sarah skry. Hamilton, GTA, Toronto, and Niagara

Prepping nicotine stained walls and cracked plaster for painting. Easy tip for painting behind radiators. sarah skry. Hamilton, GTA, Toronto, and Niagara

And finally this is the colour we have decided on for the mudroom. It’s from Parapaints and it’s called Guava. In the photo it looks a little more fluorescent than it actually is in real life. It’s still pretty bright, just not fluorescent.

Prepping nicotine stained walls and cracked plaster for painting. Easy tip for painting behind radiators. sarah skry. Hamilton, GTA, Toronto, and Niagara

Your feedback would be awesome, cause we’re really not sure what to do. Please leave a comment if you have an opinion about it, I’d love to hear from you.

That’s all for now. I’ll catch you up in the next one.


Behind the Radiators

When deciding to repaint our home one of the first things I was concerned about was how we’d paint behind the radiators. I only lived in one place before that had radiators and it was  short term rental so I didn’t bother painting the rads and nevermind behind them. We tried to brainstorm how we would do this and it was like a car trying to start in the dead of winter. Couldn’t get that engine going. There was only thing we could turn to–the search engine.

After seconds of Googling we found our answer on YouTube with this video. This guy has a pretty kickass scottish accent by the way. Shortly after that we went to our local Home Hardware and searched out a small roller and a skinny pole for the roller. Skinny enough to fit behind the rad. Chewy was helping me showcase the items.

Easy tip for painting behind radiators. sarah skry. Hamilton, GTA, Toronto, and Niagara

Next we needed to protect the rads. As per the videos instructions we covered the rads using garbage bags. I thought this would be unbelievably finnicky; however, if you just let your brain think about it for a minute you will find the solution. Just cut one side of the garbage bag and place it over the rad so the corner of the bag covers the corner of the rad with the side you cut in the center. We just repeated that process with the other side and taped the seam where the two bags met together.

Easy tip for painting behind radiators. sarah skry. Hamilton, GTA, Toronto, and Niagara

Easy tip for painting behind radiators. sarah skry. Hamilton, GTA, Toronto, and Niagara

Now there is one issue that we didn’t solve and after painting for two days decided we didn’t care and went ahead with the painting anyhow. We taped the baseboards as far as our hands would reach behind the rad but couldn’t tape the section of the baseboard that was behind the rad. Derek attempted to guide the tape through with a yard stick, but that only partially worked. You can’t see it anyway and there’s definitely no way a guest would ever notice drips of paint on a baseboard behind a radiator. I’ll admit I try to look for it sometimes simply because I know it’s there. But then I forget about it quickly.

Easy tip for painting behind radiators. sarah skry. Hamilton, GTA, Toronto, and Niagara

Easy tip for painting behind radiators. sarah skry. Hamilton, GTA, Toronto, and Niagara

We haven’t talked about repainting the rads at all mainly because we feel that the colour they are kind of suits our style and goes with the colour we chose for the walls. It’s a fairly brassy paint.

Easy tip for painting behind radiators. sarah skry. Hamilton, GTA, Toronto, and Niagara

Easy tip for painting behind radiators. sarah skry. Hamilton, GTA, Toronto, and Niagara

I thought this was handy information and thought it could help some folks that have radiators themselves. This was a short one, but hopefully a helpful one. Catch you next time neighbor.

Backyard Garden

Growing up I never gave gardens too much thought. I even think I took them for granted sometimes. I remember we didn’t really have a garden, just some flowers in beds in the front and the back yards and a couple of raspberry bushes along the back fence. I did love raspberries and I still do.

raspberries_pentax35mm

I remember when I use to walk around the corner from my parents to go visit with my grandparents or be babysat or what have you, my Nanny (that’s what we called her, her given name was Grace) would always have raspberries. She had a few raspberry bushes in her backyard. I would sit down at the kitchen table and she’d put one of those dessert cocktail glasses in front of me with a small spoon. It would be filled with raspberries and she even sprinkled sugar on top for me. Boy was I spoiled. I sure felt loved when eating that. The way to my heart is simple, fruit and sugar and sometimes both. I can’t get enough of fruit. Other than the sunshine, it is the reason summer is my favourite season.

I certainly took for granted the work it took to get those raspberry bushes established and the raspberries from the bush to my bowl. Every summer I would enjoy the berries from my backyard and hers and never gave it a second thought. It was nothing but some summer magic. Now I have (sort of) inherited  her backyard and what is left of her gardens.

Some things she planted are still there. Here is her rhubarb. It looks huge and unkept right now and that’s because it is. I keep meaning to cut it so I can give most of it to Derek’s mom. She makes a mean rhubarb cake. Mmm. It looked good before but now it’s pretty droopy, fine but droopy. Some Rose of Sharon which have not yet bloomed. Oh and I’m still learning the names for plants. Obviously their common names are much simpler to remember than the latin ones, but it’s pretty cool that there are so many different ones. I find it really fun to try and recall the names by looking at the plant and the flower itself. It’s like one of those memory card games you play as a kid. Here are some Hydranges and some more Rose of Sharon (again, not yet bloomed). Here is the showcase of the garden. These three rose bushes. They were planted 60 years ago. There are two red ones and a fire and ice on in the middle.

IMG_5284

IMG_5283

IMG_5277

IMG_5275

photo 1 (1)

photo 2 (1)

IMG_5271

This birdbath I found behind the garage and once the ground was soft enough after the winter we put it back where it was originally. But looking at it now it looks rough and it just collects stuff fallen from the tree and attracts mosquitos. That is a tree in our backyard. It is a walnut tree. There is some debate about whether it is a black walnut tree or some other type of walnut tree, but unfortunately me and Derek are the only ones debating because we don’t want it to be a black walnut tree. I have been told that the black walnut tree is a poisonous suck hole with roots that are dipped in poison that kill everything in the surrounding area and everything it touches. I was so bummed to hear this as I desperately wanted a vegetable garden and a flower garden. There is the possibility of using raised garden beds instead in case the garden doesn’t work out.

IMG_5302

IMG_5287

I was hesitant and still insistent that I would try and grow a garden. Half the tree is dead anyways I told myself. It was apparently hit by lightning some years ago and now half is dead. Its dead bits need to be pruned off though because it’s a hazard. I don’t want to be under there one day when a gust of wind comes and decides to drop a branch on me. Otherwise it’s a nice tree to look at—green leaves in the summer and they turn yellow into the fall. Some drawbacks? It drops these weirdo long seedlings before summer, (here is a botanical print of the seedlings etc. from Damman’s lawn and garden centre site) enough so that you need to pull out a rake and the walnuts themselves are super unpleasant. They are sticky and squirrels will chew ’em up and spit ’em out leaving gnarled walnuts all over the place. It also provides waaay too much shade for my liking and the garden’s liking I think.

black walnut botanical print

IMG_5289

IMG_5288

IMG_5325

Sorry the garden of Eden kind of took a turn for the worse there. I was told by gardener extraordinaire John Snippe, my best friend’s father, that people would plant them because black walnut is an expensive type of wood and that is probably why my grandpa chose to plant it. My parents have one in their backyard too as you can see in a previous post “A Family Affair” about how my grandfather and great grandfather helped build that house as well. Because they were carpenters it kind of makes sense that he would choose to plant that particular tree. I’m really just glad to have an outdoor space to enjoy in the summers. And gardens in general provide a multitude of possibilities. Gardening is sort of limitless and provides many challenges. So what do you think? Can I grow my dream garden raspberries and all? Stayed tuned for the update early this week. Catch you later.